TE loader for IDA Pro
The EFI documentation defines a simplified version of the PE32 image format, called “TE”, which is intended to reduce the overheads of the PE/COFF headers. The document in which this format is defined can be found here. Apple’s EFI firmare (or at least one version I was looking at) uses the TE image format for the SEC phase binary, but IDA Pro doesn’t seem to understand TE, so I decided to have a crack at writing a loader to handle TE images. This post describes both a bit about the TE image format, and how to go about writing a basic image loader for IDA Pro in Python.
First, a quick look at the TE image format. It is a stripped down version of PE32, so if you’re familiar with that then you’ll probably recognise these fields. The main image header looks something like this:
typedef struct {
    UINT16                   Signature;
    UINT16                   Machine;
    UINT8                    NumberOfSections;
    UINT8                    Subsystem;
    UINT16                   StrippedSize;
    UINT32                   AddressOfEntryPoint;
    UINT32                   BaseOfCode;
    UINT64                   ImageBase;
    EFI_IMAGE_DATA_DIRECTORY DataDirectory[2];
} TEImageHeader;
With the EFI_IMAGE_DATA_DIRECTORY structure looking like this:
typedef struct {
    UINT32 VirtualAddress;
    UINT32 Size;
} EFI_IMAGE_DATA_DIRECTORY;
Directly following the main header is a set of section headers (NumberOfSections of them, funnily enough) that look like this:
typedef struct{
    char    Name[8];
    int32   VirtualSize;
    int32   VirtualAddress;
    int32   SizeOfRawData;
    int32   PointerToRawData;
    int32   PointerToRelocations;
    int32   PointerToLinenumbers;
    int16   NumberOfRelocations;
    int16   NumberOfLinenumbers;
    int32   Characteristics;
} SectionHeader;
Following the section headers is the data for the sections.
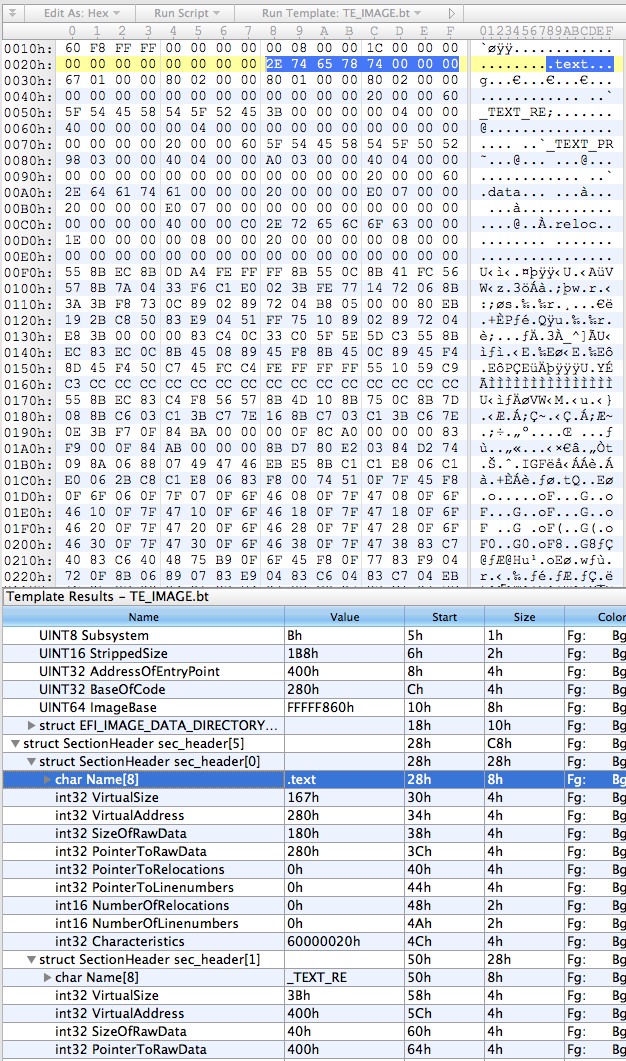
So, the first thing I did was put together a basic template for everybody’s favourite hex editor, 010 Editor, using the structs defined above:
local int32 i;

typedef UBYTE UINT8;

// insert those structs I defined above

struct SectionData (int size) {
    char data[size];
};

TEImageHeader header;
SectionHeader sec_header[header.NumberOfSections];
for (i = 0; i < header.NumberOfSections; i++) {
    SectionData section(sec_header[i].SizeOfRawData);
}
This results in something that looks about right:
The next step was to rewrite it in Python, which went something like this:
import struct
import sys
import os
try:
    from awesome_print import ap as pp
except:
    from pprint import pprint as pp

class TEImage:
    def __init__(self, f):
        self.offset = f.tell()

        # read header
        (self.signature, self.machine, self.num_sections, self.subsystem,
            self.stripped_size, self.entry_point_addr, self.code_base,
            self.image_base) = struct.unpack("<HHBBHLLQ", f.read(24))
        (d1,d2,d3,d4) = struct.unpack("<IIII", f.read(16))
        self.data_dir = [(d1,d2),(d3,d4)]

        # read section table
        self.sections = []
        for i in range(0, self.num_sections):
            self.sections.append(TEImageSection(f))

class TEImageSection:
    def __init__(self, f):
        self.offset = f.tell()

        # read header
        self.name = f.read(8)
        (self.virt_size, self.virt_addr, self.data_size, self.ptr_to_data,
            self.ptr_to_relocs, self.ptr_to_line_nums,
            self.num_relocs, self.num_line_nums,
            self.characteristics) = struct.unpack("<LLLLLLHHL", f.read(32))

if __name__ == '__main__':
    te = TEImage(open(sys.argv[1]))
    pp(te.__dict__)
    for i in range(0, len(te.sections)):
        print "section %i:" % i
        pp(te.sections[i].__dict__)
Pretty self-explanatory - classes for the image and section headers using the struct module to unpack the headers, and the main section just creating an image object from whatever file was passed as the first argument and then prettyprinting the contents of the object.
On my binary the output looks like this:
{
         subsystem: 11,
     stripped_size: 440,
        image_base: 4294965344,
          data_dir: [
    [0] (
      [0] 2048,
      [1] 28
    ),
    [1] (
      [0] 0,
      [1] 0
    )
  ],
  entry_point_addr: 1024,
         code_base: 640,
      num_sections: 5,
            offset: 0,
           machine: 332,
         signature: 23126,
          sections: [
    [0] <__main__.TEImageSection instance at 0x1058d3ab8>,
    [1] <__main__.TEImageSection instance at 0x1058d3b48>,
    [2] <__main__.TEImageSection instance at 0x1058d3b90>,
    [3] <__main__.TEImageSection instance at 0x1058d3bd8>,
    [4] <__main__.TEImageSection instance at 0x1058d3c20>
  ]
}
section 0:
{
              name: .text,
        num_relocs: 0,
   characteristics: 1610612768,
  ptr_to_line_nums: 0,
     num_line_nums: 0,
         virt_addr: 640,
       ptr_to_data: 640,
            offset: 40,
         virt_size: 359,
         data_size: 384,
     ptr_to_relocs: 0
}
section 1:
{
              name: _TEXT_RE,
        num_relocs: 0,
   characteristics: 1610612768,
  ptr_to_line_nums: 0,
     num_line_nums: 0,
         virt_addr: 1024,
       ptr_to_data: 1024,
            offset: 80,
         virt_size: 59,
         data_size: 64,
     ptr_to_relocs: 0
}
section 2:
{
              name: _TEXT_PR,
        num_relocs: 0,
   characteristics: 1610612768,
  ptr_to_line_nums: 0,
     num_line_nums: 0,
         virt_addr: 1088,
       ptr_to_data: 1088,
            offset: 120,
         virt_size: 920,
         data_size: 928,
     ptr_to_relocs: 0
}
section 3:
{
              name: .data,
        num_relocs: 0,
   characteristics: 3221225536,
  ptr_to_line_nums: 0,
     num_line_nums: 0,
         virt_addr: 2016,
       ptr_to_data: 2016,
            offset: 160,
         virt_size: 32,
         data_size: 32,
     ptr_to_relocs: 0
}
section 4:
{
              name: .reloc,
        num_relocs: 0,
   characteristics: 0,
  ptr_to_line_nums: 0,
     num_line_nums: 0,
         virt_addr: 2048,
       ptr_to_data: 2048,
            offset: 200,
         virt_size: 30,
         data_size: 32,
     ptr_to_relocs: 0
}
Not pretty, but it looks like it’s doing the job.
The final stage is to add the IDA loading code. IDA loaders can be implemented as fully fledged plugins with the SDK, or as IDC or IDAPython scripts. I obviously chose the last option, because who wouldn’t? IDA loaders rely on two functions: accept_file() and load_file(). accept_file() is called in every loader when a binary is opened in IDA, to ask the loader if it can load that type of file. All we have to do in this function is check the file’s magic number and make sure it looks like a TE binary:
TE_MAGIC = "VZ"

def accept_file(f, n):
    retval = 0

    if n == 0:
        f.seek(0)
        if f.read(2) == TE_MAGIC:
            retval = "TE executable"

    return retval
The f parameter here is an open file handle, and n is the number of times this loader has been queried so far (not really important for this type of loader). If it looks good, we return the string that will appear in IDA’s “Load a new file” window, otherwise return 0.
load_file() is where the good stuff happens. As the name indicates, this function is called by IDA to actually perform the loading of the file. Hurr.
SECTION_CLASSES = {
    b".text\0\0\0": "CODE",
    b".data\0\0\0": "DATA",
    b".reloc\0\0":  "DATA",
    b"_TEXT_RE":    "CODE",
    b"_TEXT_PR":    "CODE"
}

SECTION_MODES = {
    b"_TEXT_RE":    0,
}

def load_file(f, neflags, format):
    # parse header
    f.seek(0)
    te = TEImage(f)

    # load binary
    for sec in te.sections:
        seg_type = SECTION_CLASSES[sec.name] if sec.name in SECTION_CLASSES.keys() else "DATA"
        seg_mode = SECTION_MODES[sec.name] if sec.name in SECTION_MODES.keys() else 1
        f.file2base(f.tell(), sec.virt_addr, sec.virt_addr + sec.data_size, 1)
        add_segm(0, sec.virt_addr, sec.virt_addr + sec.virt_size, sec.name, seg_type)
        set_segm_addressing(get_segm_by_name(sec.name), seg_mode)

    add_entry(te.entry_point_addr, te.entry_point_addr, "_start", 1)

    return 1
So we first use the classes we built earlier to parse the headers. Then for each section (segment) we need to determine the class (ie. whether it’s data or code or relocations or whatever), and the addressing mode (this is important because the entry point will be in 16-bit mode). Call file2base() to read the section’s data into IDA at the virtual address specified in the section header, add_segm() to create a segment of the appropriate type at this virtual address, and set_segm_addressing() to mark the segment as 16-bit if necessary. Once we’ve added all the segments into IDA we mark the entry point, and return 1 to tell IDA all is well.
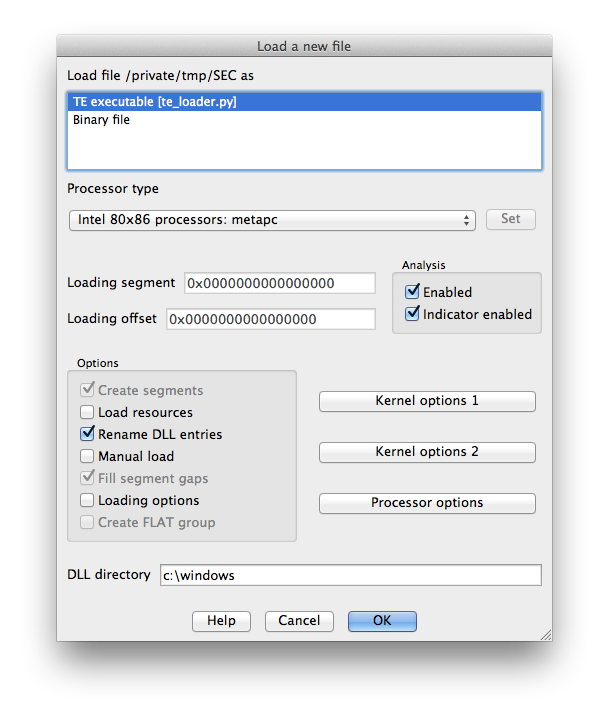
To install the loader, I just symlinked it into IDA’s loaders directory. On OS X this is actually inside the application bundle at idaq.app/Contents/MacOS/loaders/ (idaq64.app looks inside idaq.app as well).
Now when we open IDA and drop in our TE binary we get some good news:
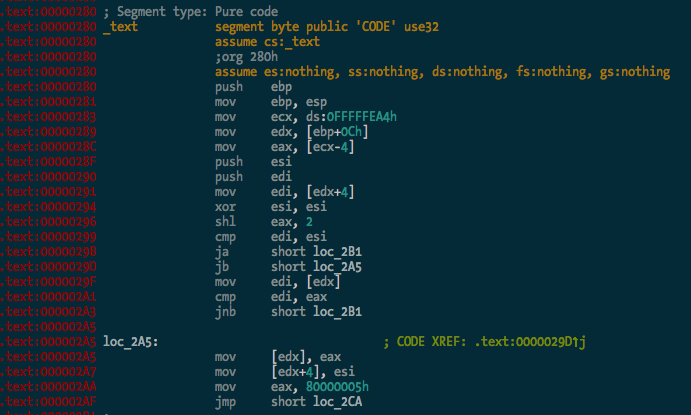
The binary is processed and the .text segment looks OK:
And here’s the entry point in 16-bit mode, the first bit of code executed by the CPU when you power on the Mac:
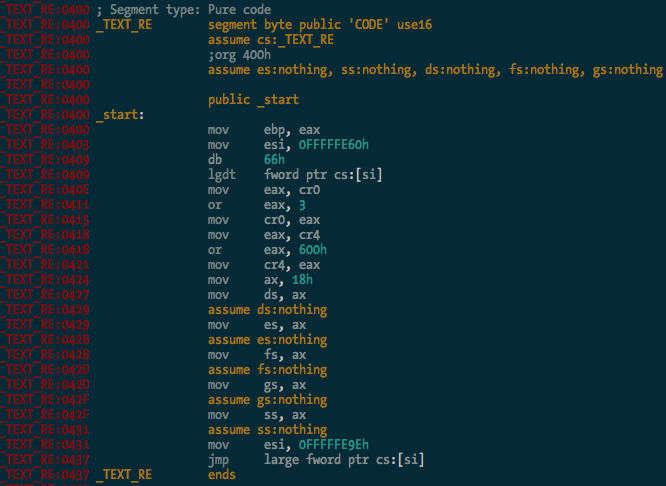
You can see it there loading the GDT, and enabling protected mode and SSE extensions before carrying on with the rest of the CPU init stuff. Good times.
So there you go - a simple binary loader for IDA Pro in Python. I haven’t bothered implementing relocation fixups and whatnot yet, but I probably will at some stage. It’s 2:41am and I’m tired. The source code is in the ida-efiutils package on Github.
Ruxcon 2012
I presented my research into EFI rootkits at Ruxcon 2012 in Melbourne, Australia on Saturday. You can find the slides right here.
IDA Pro scripts for EFI reversing
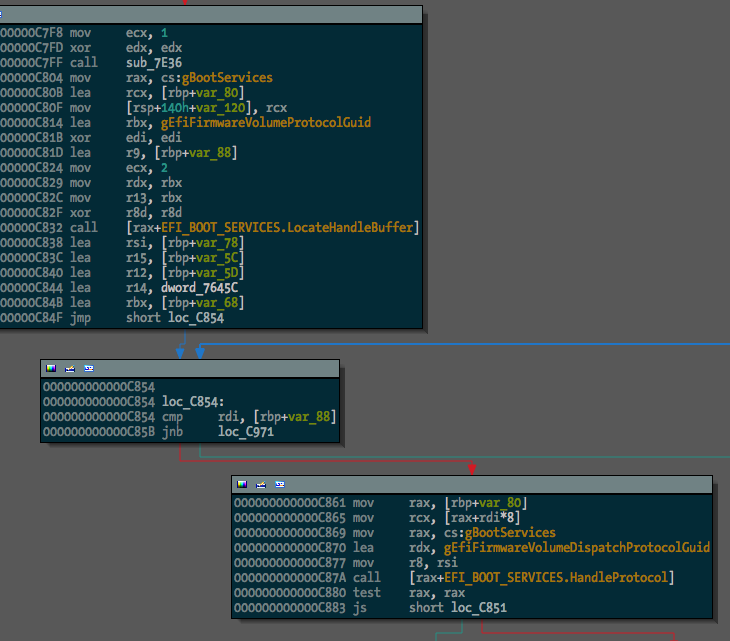
Reverse engineering EFI executables is a bit of a pain in the arse due to the way linking works with EFI. All EFI executables are statically linked, and there is no dynamic linking/loading in the traditional sense. Much of the core EFI functionality is exposed through several “tables” - the System Table, Boot Services Table and Runtime Services Table. These are just structs containing a bunch of pointers to functions and data that are accessed by executables running in the EFI environment. I won’t go further into the details of the tables - if you’re reading this you’re probably well across it already, but if not, check out the EFI spec.
When an EFI binary is executed by the DXE or BDS phase of boot, the binary is just loaded into memory and the entry point is called like any other function. The EFI System Table is passed as a parameter to the entry point function, along with a reference to the Image Handle, and the Boot Services and Runtime Services tables are retrieved from the System Table. From here, EFI functionality is accessed from within the executable by making calls to function pointers in the various tables - for example, the Boot Services function AllocatePool() for allocating memory on the heap.
Since there are no references in the binary to external symbols, reversing an EFI binary becomes a bit more difficult. Calling a Boot Services function might look like this:
mov     rax, cs:qword_whatever
call    qword ptr [rax+150h]
Not particularly useful. What we want to see is something more like this:
mov     rax, cs:gBootServices
call    [rax+EFI_BOOT_SERVICES.UninstallMultipleProtocolInterfaces]
Manually changing all the references to EFI tables into struct offsets is painful, so I’ve written some IDAPython code to make it a bit easier. The Github repo is here.
The first task is finding global variables where the various EFI tables are stored. This can be done (for the few binaries I’ve tested with) by the rename_tables() function in efiutils.py. Once that’s done, the update_structs() function will find xrefs to these globals and rename any references to these structures.
Before running the script, one binary (a free hug to the first person to tell me what it is) looked like this:
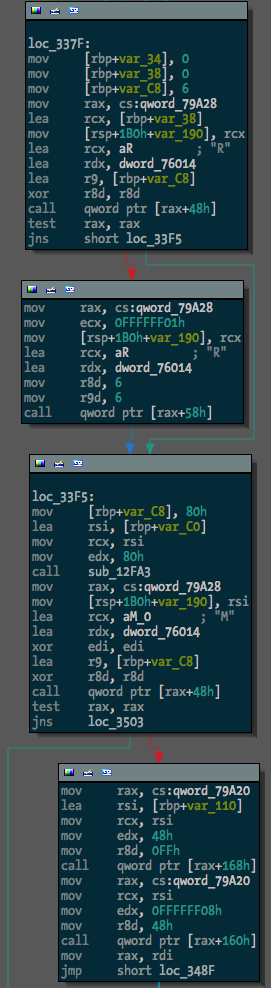
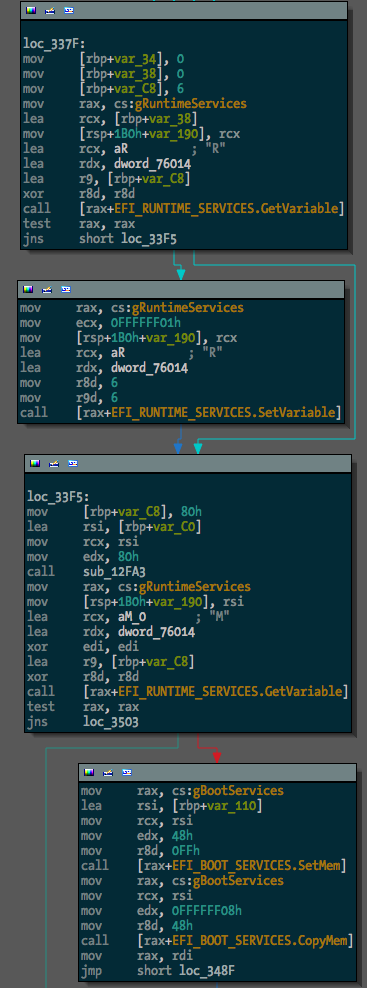
After, something much more useful:
The next step in making EFI reversing easier is going to be locating and renaming function pointers within EFI protocol blocks. I guess I’ll get to it.
Update: OK, I’ve added searching for and renaming of GUIDs with the rename_guids() function.
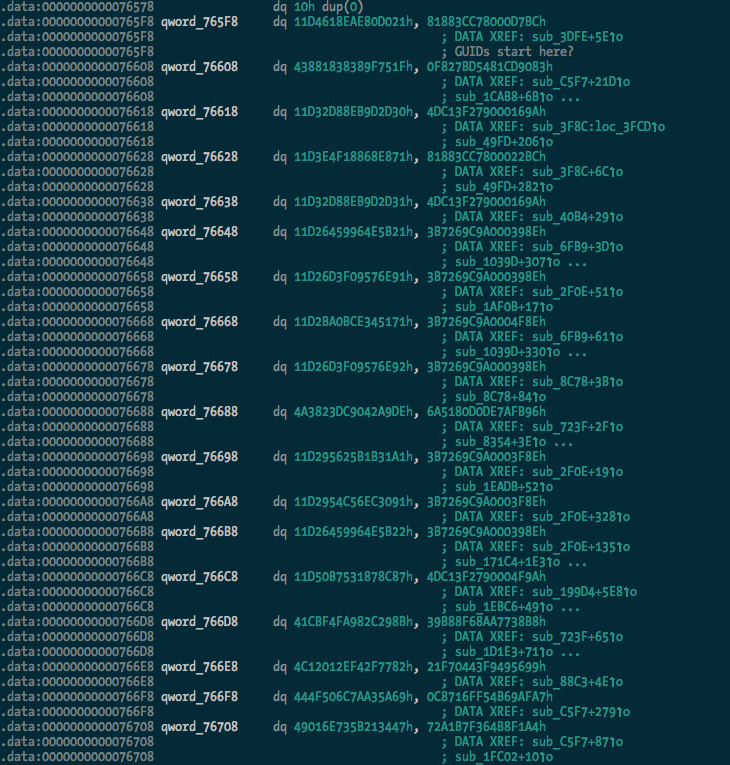
Before:
After:
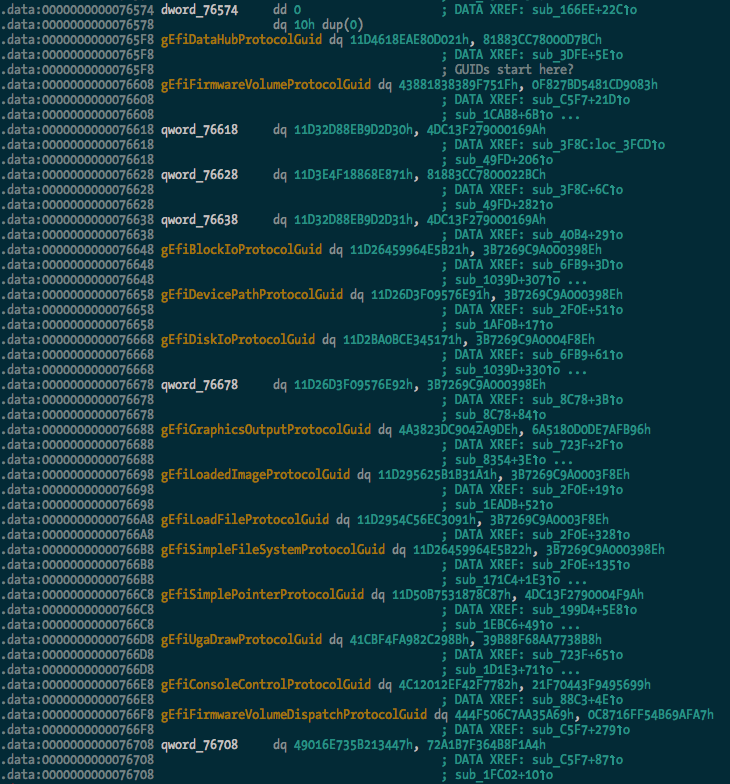
And we can see some of the protocol usage starting to take shape:
I extracted a pretty large list of guids (470 of them) from the TianoCore source, which should be found and renamed in any data(ish) segment in the binary.
Building rEFInd with EDKII on Mac OS X
rEFInd is a fork of the rEFIt EFI boot manager. I ran into some issues building rEFInd on Mac OS X with the EDKII using the Makefile(s) provided by the author, which are intended to be used for building on Linux. A number of gcc and ld options used are incompatible with the Mac OS X toolchain. Rather than do the right thing and figure out what the appropriate options are, I’ve just dumped the rEFInd source into a new Package in the EDKII and added DSC and DEC files to get it to build on OS X.
The build information files can be found on github.
Building
-
Prepare and build your EDKII environment (outside of the scope of this document).
-
Clone the repository into the root directory of the EDKII.
$ cd /path/to/edk2 $ git clone https://github.com/snarez/refind-edk2.git RefindPkg -
Download the latest version of the rEFInd source into the RefindPkg directory and unpack it.
$ cd RefindPkg $ wget http://downloads.sourceforge.net/project/refind/0.4.5/refind-src-0.4.5.zip $ unzip refind-src-0.4.5.zip -
Create a symlink so that the path referred to in the DSC file makes sense.
$ ln -s refind-0.4.5 refind -
Build the package.
  $ cd ..
  $ source edksetup.sh
  $ build -p RefindPkg/RefindPkg.dsc
This works for me on Mac OS X 10.7.4 with Xcode 4.4.1 and its command line tools. Drop me a line if you have any problems.
Black Hat USA 2012
Hello internet dudes. I am privileged to be presenting my EFI rootkit research at Black Hat USA this year in scorching Las Vegas. If you’re going to be at the conference come along and check out my talk on Thursday July 26, and/or hit me up on twitter. I’ll be in town for DEF CON as well, of course.
I’ll be talking about some of the same stuff that I talked about at SyScan - how EFI can be used in a Mac OS X rootkit, how the kernel payload can work, etc - but I’ll also be talking about and demonstrating a pretty sweet new attack, so stay tuned. I’ll upload the slides for the presentation and the white paper as soon as I’ve finished presenting and have had 2 beers.
Update: I tweeted the links to the materials shortly after my talk, but here they are: Slides / Paper.
Un-bricking a MacBook
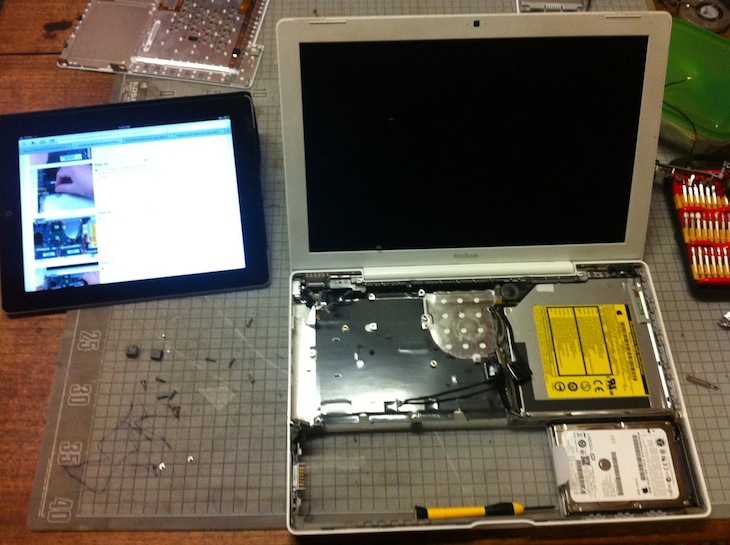
In my tinkering with EFI I attempted to flash some backdoored firmware to a test MacBook that was kindly donated to science by a friend of mine. This resulted in the bastard doing the S.O.S. beeps and not booting, and it didn’t seem to be recoverable using the Firmware Restore CDs from Apple. I decided that since it was dead anyway I might as well try and recover it by re-flashing the firmware manually using the nifty Bus Pirate that I impulse-bought not long ago, and a copy of flashrom.
First things first - an appropriate beer:

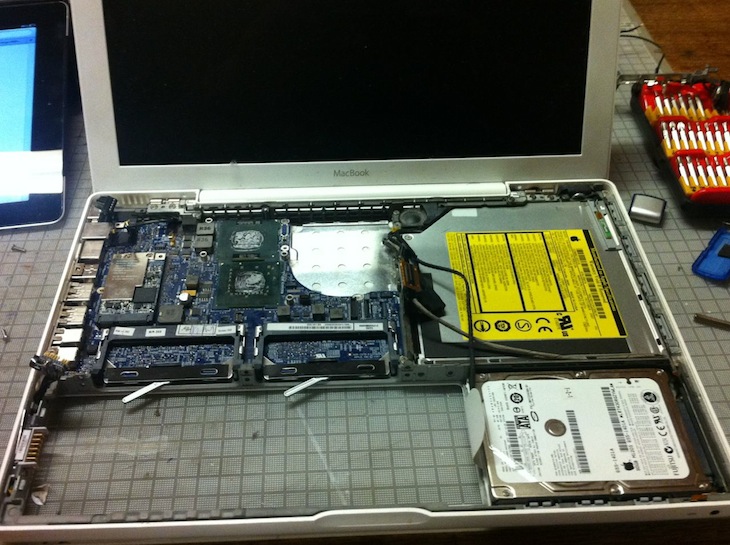
Next, I disassembled the MacBook with the help of the iFixit MacBook take apart guide (wasn’t exactly the right model, but close enough). Here’s the remains of the machine after I removed the logic board:
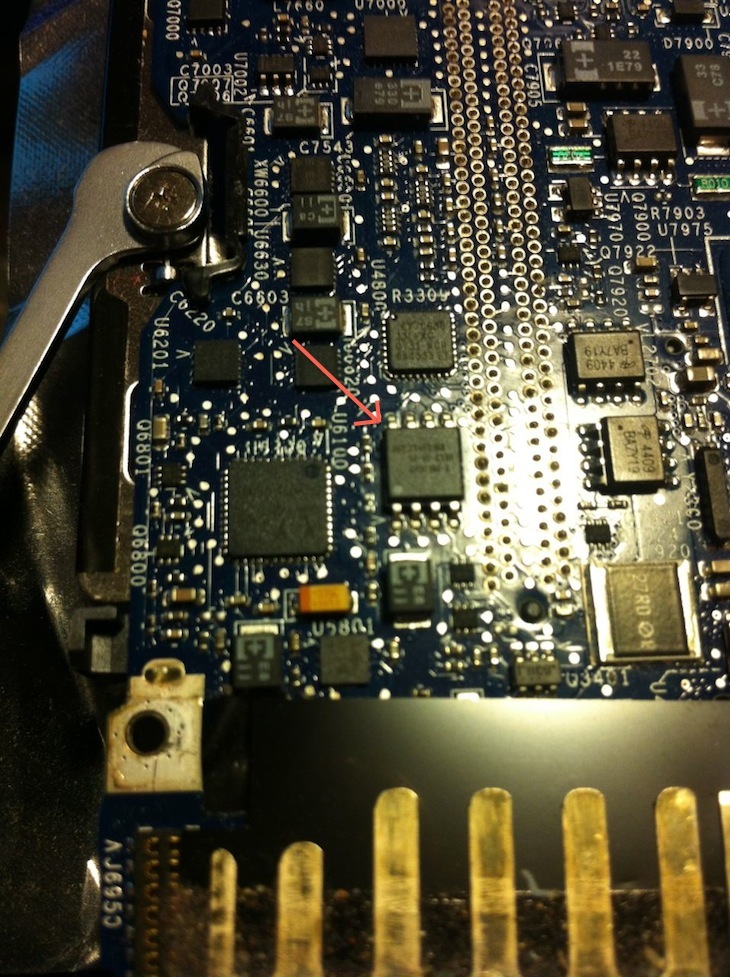
I had to hunt around on the board a bit to find the flash that contains the EFI firmware, but knowing the model number from when I bricked it helped. Found it!
Now that I’d found the flash I had to wire up the Bus Pirate and hope the chip would be programmable in-circuit without any hassles:
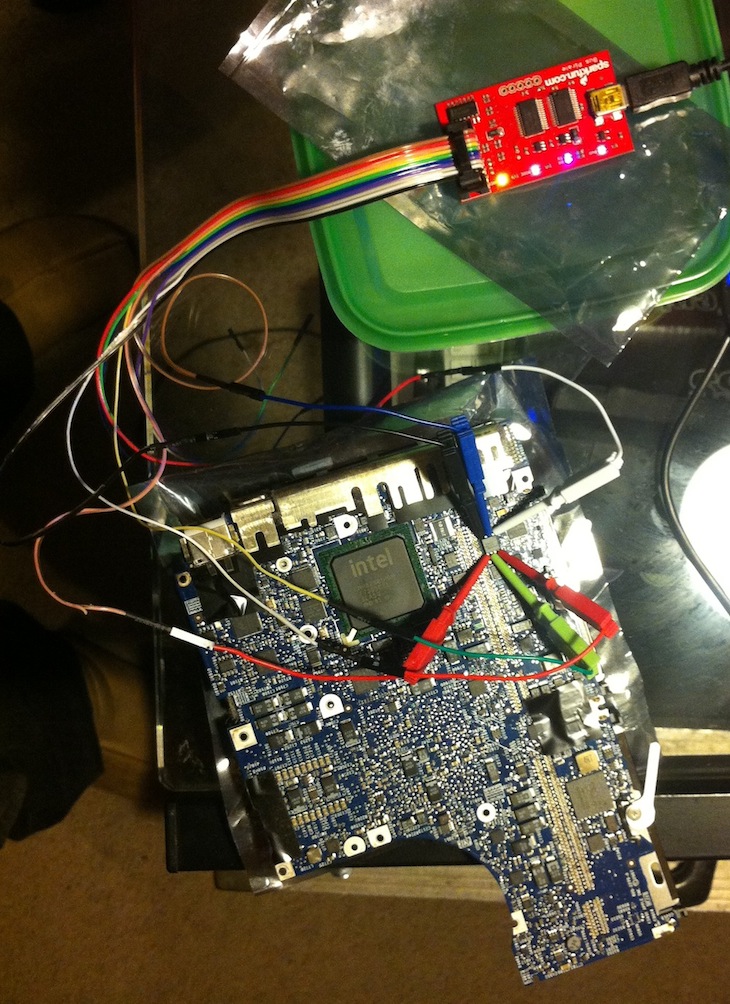
After a few false starts and some confusion with wiring between Bus Pirate versions, flashrom detected the chip:
# flashrom -V -p buspirate_spi:dev=/dev/tty.usbserial-A800KC47
flashrom v0.9.5.2-r1515 on Darwin 11.3.0 (x86_64), built with libpci 3.1.7, LLVM Clang 3.1 (tags/Apple/clang-318.0.58), little endian
flashrom is free software, get the source code at http://www.flashrom.org

Calibrating delay loop... OS timer resolution is 1 usecs, 1619M loops per second, 10 myus = 10 us, 100 myus = 101 us, 1000 myus = 1015 us, 10000 myus = 9863 us, 4 myus = 3 us, OK.
Initializing buspirate_spi programmer
SPI speed is 8MHz
Raw bitbang mode version 1
Raw SPI mode version 1
The following protocols are supported: SPI.
Probing for AMIC A25L05PT, 64 kB: RDID byte 0 parity violation. probe_spi_rdid_generic: id1 0x00, id2 0x00
<snip>
Probing for SST SST25VF016B, 2048 kB: probe_spi_rdid_generic: id1 0xbf, id2 0x2541
Chip status register is 1c
Chip status register: Block Protect Write Disable (BPL) is not set
Chip status register: Auto Address Increment Programming (AAI) is not set
Chip status register: Bit 5 / Block Protect 3 (BP3) is not set
Chip status register: Bit 4 / Block Protect 2 (BP2) is set
Chip status register: Bit 3 / Block Protect 1 (BP1) is set
Chip status register: Bit 2 / Block Protect 0 (BP0) is set
Chip status register: Write Enable Latch (WEL) is not set
Chip status register: Write In Progress (WIP/BUSY) is not set
Resulting block protection : all
Found SST flash chip "SST25VF016B" (2048 kB, SPI) on buspirate_spi.
Probing for SST SST25VF032B, 4096 kB: probe_spi_rdid_generic: id1 0xbf, id2 0x2541
Found SST flash chip "SST25VF016B" (2048 kB, SPI).
No operations were specified.
Raw bitbang mode version 1
Bus Pirate shutdown completed.
Looking good! So next I read back the dodgy firmware to make sure it looked like everything was working OK:
# flashrom -V -p buspirate_spi:dev=/dev/tty.usbserial-A800KC47,spispeed=8M -r macbook_buspirate.rom
<snip>
Found SST flash chip "SST25VF016B" (2048 kB, SPI).
Some block protection in effect, disabling
Missing status register write definition, assuming EWSR is needed
Reading flash... done.
Raw bitbang mode version 1
Bus Pirate shutdown completed.
This took a good half hour plus, maybe 45 minutes. Apparently there are some recent Bus Pirate speedups for flashrom but I didn’t wanna mess with it since it was working. A quick look at the firmware that was read back, and it looks OK compared to the original one that I read before flashing the dodgy one:
# hexdump macbook_buspirate.rom|head -5
0000000 00 00 00 00 00 00 00 00 bc e5 c8 87 00 00 00 00
0000010 d9 54 93 7a 68 04 4a 44 81 ce 0b f6 17 d8 90 df
0000020 00 00 19 00 00 00 00 00 5f 46 56 48 ff 8e ff ff
0000030 48 00 fd de 00 00 00 01 19 00 00 00 00 00 01 00
0000040 00 00 00 00 00 00 00 00 25 71 52 11 b2 78 3e 4d

# hexdump dump_from_macbook.fd|head -5
0000000 00 00 00 00 00 00 00 00 bc e5 c8 87 00 00 00 00
0000010 d9 54 93 7a 68 04 4a 44 81 ce 0b f6 17 d8 90 df
0000020 00 00 19 00 00 00 00 00 5f 46 56 48 ff 8e ff ff
0000030 48 00 fd de 00 00 00 01 19 00 00 00 00 00 01 00
0000040 00 00 00 00 00 00 00 00 25 71 52 11 b2 78 3e 4d
Time to write the original firmware back to the flash chip:
# flashrom -V -p buspirate_spi:dev=/dev/tty.usbserial-A800KC47,spispeed=8M -w dump_from_macbook.fd
flashrom v0.9.5.2-r1515 on Darwin 11.3.0 (x86_64), built with libpci 3.1.7, LLVM Clang 3.1 (tags/Apple/clang-318.0.58), little endian
flashrom is free software, get the source code at http://www.flashrom.org

Calibrating delay loop... OS timer resolution is 1 usecs, 1597M loops per second, 10 myus = 11 us, 100 myus = 100 us, 1000 myus = 1001 us, 10000 myus = 10081 us, 4 myus = 4 us, OK.
Initializing buspirate_spi programmer
SPI speed is 8MHz
Raw bitbang mode version 1
Raw SPI mode version 1
The following protocols are supported: SPI.
Probing for AMIC A25L05PT, 64 kB: RDID byte 0 parity violation. probe_spi_rdid_generic: id1 0x00, id2 0x00
<snip>
Found SST flash chip "SST25VF016B" (2048 kB, SPI).
Some block protection in effect, disabling
Missing status register write definition, assuming EWSR is needed
Reading old flash chip contents... done.
Erasing and writing flash chip... Trying erase function 0... 0x000000-0x000fff:S, 0x001000-0x001fff:S, 0x002000-0x002fff:S,
<snip>
0x1fe000-0x1fefff:S, 0x1ff000-0x1fffff:S
Erase/write done.
Verifying flash... VERIFIED.
Raw bitbang mode version 1
Bus Pirate shutdown completed.
This took about 3 times as long as the read, as it had to read the flash back, erase the chip (which was pretty quick), write the new firmware, and then read the firmware back again to verify the write. After reassembling the machine:
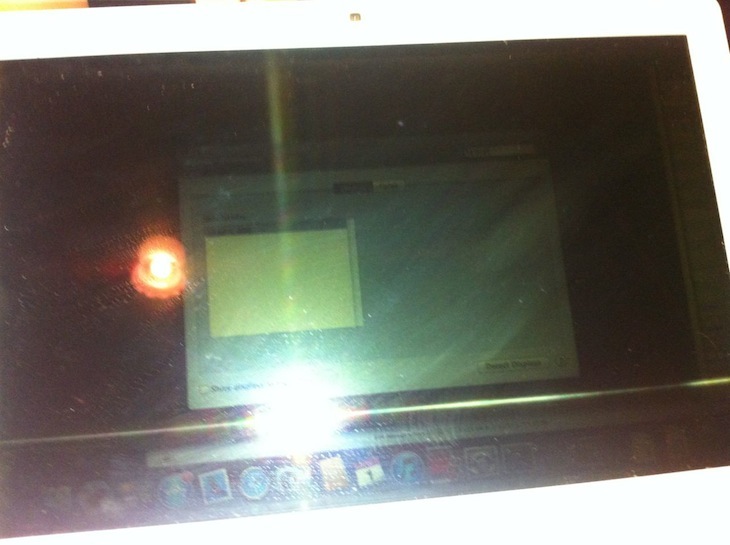
It booted first go! I was honestly pretty surprised that I didn’t destroy something. Unfortunately the screen backlight is broken (which is why it was donated to science in the first place), so it’s a bit hard to see that it still works:
flashrom rules. Bus Pirate rules.
Send me your `lspci -vv`
Got an Mac? I need your help. I want to find out a bit more about the hardware that’s in various Intel Macs – specifically about built-in PCI devices with onboard expansion ROMs. You can help me out by sending me the output of lspci -vv on your Mac. The only catch is you need to install a kernel extension to do it. But don’t worry, it’s software written by the CoreBoot dudes! They’re trustworthy, I swear!
EDIT2: I’ve had a couple of people having trouble building DirectHW. I’ve uploaded binaries here and here if you don’t want to build/have trouble building from source (and trust me).
The mission is dangerous, but if you’re ready, willing and able, this is what you need to do:
$ git clone http://review.coreboot.org/p/directhw.git
Cloning into 'directhw'...

remote: Counting objects: 59, done
remote: Finding sources: 100% (59/59)
remote: Total 59 (delta 16), reused 59 (delta 16)
Unpacking objects: 100% (59/59), done.

$ cd directhw/macosx
$ make pciutils
<snip>
created: /path/to/directhw/macosx/pciutils-3.1.7.dmg
Disk image done

$ make directhw
<snip>
created: /path/to/directhw/macosx/DirectHW/DirectHW.dmg
Disk image done
You’ll now have those two disk images created at the paths displayed at the end of the make processes. Install the packages in each of the DMGs, and then load the kernel extension:
$ sudo kextload /System/Library/Extensions/DirectHW.kext
EDIT: Oh I forgot, please turn off the energy saver setting (on laptops) to automatically switch graphics or whatever, so the non-integrated graphics card is powered on. You might need to log out and back in before it is powered on.
And get me the sweet, sweet lspci goodies:
$ sudo lspci -vv
00:00.0 Host bridge: Intel Corporation Device 0104 (rev 09)
	Subsystem: Apple Computer Inc. Device 00dc
	Control: I/O- Mem+ BusMaster+ SpecCycle- MemWINV- VGASnoop- ParErr- Stepping- SERR- FastB2B- DisINTx-
	Status: Cap+ 66MHz- UDF- FastB2B+ ParErr- DEVSEL=fast >TAbort- <TAbort- <MAbort+ >SERR- <PERR- INTx-
	Latency: 0
	Capabilities: [e0] Vendor Specific Information: Len=0c <?>
<snip>
Including the model and hardware specs of the machine would be great too:
$ system_profiler SPHardwareDataType|grep -v UUID|grep -v Serial
Hardware:

Hardware Overview:

  Model Name: iMac
<snip>
Email me the results at snare [at] this domain, or pastebin/gist it and tweet it at me. I appreciate all the help I can get, thanks very much!
If you don’t want this stuff to hang around on your machine you can rm the following stuff (gleaned from the Archive.boms):
PCIUtils:
/usr/include/pci
/usr/include/pci/config.h
/usr/include/pci/header.h
/usr/include/pci/pci.h
/usr/include/pci/types.h
/usr/lib/libpci.a
/usr/lib/pkgconfig
/usr/lib/pkgconfig/libpci.pc
/usr/sbin/lspci
/usr/sbin/setpci
/usr/sbin/update-pciids
/usr/share/man/man7/pcilib.7
/usr/share/man/man8/lspci.8
/usr/share/man/man8/setpci.8
/usr/share/man/man8/update-pciids.8
/usr/share/pci.ids.gz

DirectHW:
/System/Library/Extensions/DirectHW.kext
/System/Library/Frameworks/DirectHW.framework
SyScan 2012 is Over
SyScan 2012 was a blast. I talked shit about EFI rootkits, which was pretty fun. My slides are uploaded here if you’re interested.
A couple of highlights for me were Brett Moore’s talk about process continuation (I’m kinda surprised IE didn’t crash spontaneously and ruin his demos), Alex Ionescu’s talk about ACPI 5.0 rootkits (Alex lost his laptop on the way over and had to rewrite his talk AND demos - still nailed it), and Stefan Esser’s talk about the iOS kernel heap (crossover with OS X kernel is very interesting to me). Oh and the chilli crab.
I’ll definitely be making an effort to get over to Singapore for SyScan 2013. Thomas Lim knows how to put on a con/party.
Carving up EFI fat binaries
Apple uses a custom fat binary format so their EFI applications can contain both 32-bit and 64-bit sections. IDA Pro isn’t too keen on this format, and (last time I looked) won’t disassemble them unless you specify the starting offset for the architecture section you want to disassemble.
The format is just a header that looks like this:
typedef struct {
    UINT32 magic;               // Apple EFI fat binary magic number (0x0ef1fab9)
    UINT32 num_archs;           // number of architectures
    EFIFatArchHeader archs[];   // architecture headers
} EFIFatHeader;
Followed by some architecture headers that look like this:
typedef struct {
    UINT32 cpu_type;    // probably 0x07 (CPU_TYPE_X86) or 0x01000007 (CPU_TYPE_X86_64)
    UINT32 cpu_subtype; // probably 3 (CPU_SUBTYPE_I386_ALL)
    UINT32 offset;      // offset to beginning of architecture section
    UINT32 size;        // size of arch section
    UINT32 align;       // alignment
} EFIFatArchHeader;
Followed by the data for the sections.
I wrote a quick bit of python early last year to parse the headers and split the fat binaries into their single architecture sections and thought someone might find it useful. It’s on my github. I’ve got a couple of other half finished EFI-related scripts that I’ll add to that repo soon, when they are a bit more useful.
Running efi_lipo.py:
$ ./efi_lipo.py SmcFlasher.efi
processing 'SmcFlasher.efi'
this is an EFI fat binary with 2 architectures
architecture 0 (X86):
  offset: 0x30
  size:   0x8bd0
architecture 1 (X64):
  offset: 0x8c00
  size:   0x9e70
saving X86 section to 'SmcFlasher.efi.X86'
saving X64 section to 'SmcFlasher.efi.X64'
It might have been better to write an IDA Python script to do it instead, maybe I’ll do that at some stage, but this does the job for now.
The rEFIt site has some good info on the data structure layout, as does awkwardTV.
VMware debugging II: "Hardware" debugging
A few days ago I wrote an article about debugging the OS X kernel with VMware and GDB, using Apple’s Kernel Debugger Protocol (KDP). There is another method of debugging XNU that is worth mentioning - VMware Fusion’s built in debug server. This is the virtual equivalent of a hardware debugger on a physical machine. According to a VMware engineer:
… when you stop execution, all cores are halted, the guest doesn’t even know that time has stopped, and you can happily single-step interrupt handlers, exceptions, etc.
This is pretty awesome, and has a few advantages over KDP:
- It’s easier to break into the debugger - you can use the normal
^Cmethod from the GDB session, rather than having to either insertint 3’s into your code or insert breakpoints on predictable function calls likekext_alloc()when you attach the debugger at boot time. - It’s faster - KDP works over UDP and seems to have a few timing issues where it drops packets or the target kernel doesn’t respond in time (particularly in the more complex
kgmacroscommands), whereas the VMware debug stub seems to be substantially faster and (so far) more reliable. - You can debug anything from the time the VM is powered on - this means that you can debug non-
DEBUGXNU kernels, along with EFI stuff, the bootloader (boot.efi), whatever you want.
VMware setup
Getting this going is pretty easy, it just requires a couple of config options to be added to the .vmx file for your virtual machine. For example, if you have a VM called Lion.vmwarevm there’ll be a file inside called Lion.vmx which contains the configuration for the VM. Add the following lines (while the VM is not running):
debugStub.listen.guest32 = "TRUE"
debugStub.listen.guest64 = "TRUE"
The debug stub listens on the loopback interface on the Mac OS X host OS on which Fusion is running. If you want to debug from another machine (or VM) you need to enable the ‘remote’ listener in the .vmx file instead of (or as well as) the local listener:
debugStub.listen.guest32.remote = "TRUE"
debugStub.listen.guest64.remote = "TRUE"
Using this method you can connect to the debug stub from an instance of the FSF version of GDB on a Linux box.
That’s it, start up the VM. If you’re using a VM with a DEBUG kernel and you’ve set the boot-args variable in NVRAM to contain debug=0x1, as per the previous article, you will need to attach another instance of GDB via KDP at this point and continue in that instance to let the boot process finish.
GDB
I’ve found that if you try to connect to the debug stub without loading a file to debug you get errors like this:
[New thread 1]
Remote register badly formatted: T05thread:00000001;06:10d3fc7f00000000;07:c0d2fc7f00000000;10:8a18a07d00000000;
here: 0000000;07:c0d2fc7f00000000;10:8a18a07d00000000;
So start up GDB with whatever you’re intending to debug. In this example, the DEBUG kernel that is installed on the VM:
$ gdb /Volumes/KernelDebugKit/DEBUG_Kernel/mach_kernelIf you’re debugging a 32-bit VM on a 64-bit machine, you’ll need to set the architecture:
gdb$ set architecture i386Or, if you are debugging 64-bit on 64-bit and have trouble connecting to the debug stub, you may need to explicitly set it to 64-bit:
gdb$ set architecture i386:x86-64If you’re debugging a 64-bit VM, connect to the 64-bit debug stub:
gdb$ target remote localhost:8864Or the 32-bit debug stub for a 32-bit VM:
gdb$ target remote localhost:8832At this point you should be connected to the debug stub, and the VM should be paused. You’ll see a dark translucent version of the ‘play’ button used to start the VM on the VM console (indicating the VM is paused and the debugger has control), and something like this in GDB:
[New thread 1]
warning: Error 268435459 getting port names from mach_port_names
[Switching to process 1 thread 0x0]
0xffffff80008bf4c2 in tweak_crypt_group ()
gdb$
tweak_crypt_group() - heh. My VM is encrypting its disk at the moment.
Now you’re in familiar territory:
gdb$ source /Volumes/KernelDebugKit/kgmacros
Loading Kernel GDB Macros package.  Type "help kgm" for more info.
gdb$ bt
#0  0xffffff7f817315b4 in ?? ()
#1  0xffffff7f8172343e in ?? ()
#2  0xffffff7f81724f68 in ?? ()
#3  0xffffff8000379b18 in machine_idle () at pmCPU.c:107
#4  0xffffff800025c357 in processor_idle (thread=0xffffff8008712b80, processor=0xffffff8000c9be20) at sched_prim.c:3928
#5  0xffffff8000257060 in thread_select_idle (thread=0xffffff8008712b80, processor=0xffffff8000c9be20) at sched_prim.c:1793
#6  0xffffff8000256d8e in thread_select (thread=0xffffff8008712b80, processor=0xffffff8000c9be20) at sched_prim.c:1728
#7  0xffffff8000258bbf in thread_block_reason (continuation=0xffffff8000227270 <ipc_mqueue_receive_continue>, parameter=0x0, reason=0x0) at sched_prim.c:2396
#8  0xffffff8000258cbc in thread_block (continuation=0xffffff8000227270 <ipc_mqueue_receive_continue>) at sched_prim.c:2415
#9  0xffffff8000227357 in ipc_mqueue_receive (mqueue=0xffffff8008854728, option=0x7000006, max_size=0xc00, rcv_timeout=0xffffffff, interruptible=0x2) at ipc_mqueue.c:698
#10 0xffffff8000237542 in mach_msg_overwrite_trap (args=0xffffff800872b804) at mach_msg.c:528
#11 0xffffff80002375b4 in mach_msg_trap (args=0xffffff800872b804) at mach_msg.c:554
#12 0xffffff8000354a01 in mach_call_munger64 (state=0xffffff800872b800) at bsd_i386.c:534
gdb$ showalltasks
task                vm_map              ipc_space          #acts   pid  process             io_policy    wq_state   command
0xffffff80067ac938  0xffffff800249ee98  0xffffff80066ebdb0    60     0  0xffffff8000cb4c20                          kernel_task
0xffffff80067ac5a0  0xffffff800249e200  0xffffff80066ebd10     3     1  0xffffff8007576820                          launchd
0xffffff80067ac208  0xffffff800249e010  0xffffff80066ebc70     1     2  0xffffff80075763d0                          launchctl
0xffffff80067ab740  0xffffff800249e108  0xffffff80066eba90     3    10  0xffffff80075756e0                2  1  0   kextd
0xffffff80067abe70  0xffffff8007003568  0xffffff80066ebbd0     3    11  0xffffff8007575f80                1  0  0   UserEventAgent
0xffffff80067abad8  0xffffff8007e692f8  0xffffff80066ebb30     3    12  0xffffff8007575b30                1  0  0   mDNSResponder
<snip>
Don’t forget you can just ^C to drop back into the debuggger just like back in the good old userland days:
gdb$ c
^C
Program received signal SIGINT, Interrupt.
0xffffff7f817315b4 in ?? ()
gdb$ bt
#0  0xffffff7f817315b4 in ?? ()
#1  0xffffff7f8172343e in ?? ()
#2  0xffffff7f81724f68 in ?? ()
#3  0xffffff8000379b18 in machine_idle () at pmCPU.c:107
#4  0xffffff800025c357 in processor_idle (thread=0xffffff8008712b80, processor=0xffffff8000c9be20) at sched_prim.c:3928
<snip>
Enjoy.

